
Have you ever had an idea that you immediately scoffed at? You know the one: Where, as soon as the thought forms in your head, you laugh at the absurdity… Despite the pie-in-the-sky nature of it all, you share it with your husband anyway, with the first words out of your mouth being, “I know this sounds nuts, but…” And then what if you just went and did it anyway?? If this kind of story sounds intriguing, read on….
Last year I went to my Department Christmas party in the most amazing vintage novelty skirt. Made of a heavy cream felt and appliquéd with a 3D Christmas tree, it was definitely the hit of the night. But everyone who exclaimed over my skirt had to ask: “Does the tree light up??”
Sigh. Sadly, it did not. But, boy did that get my wheels turning…


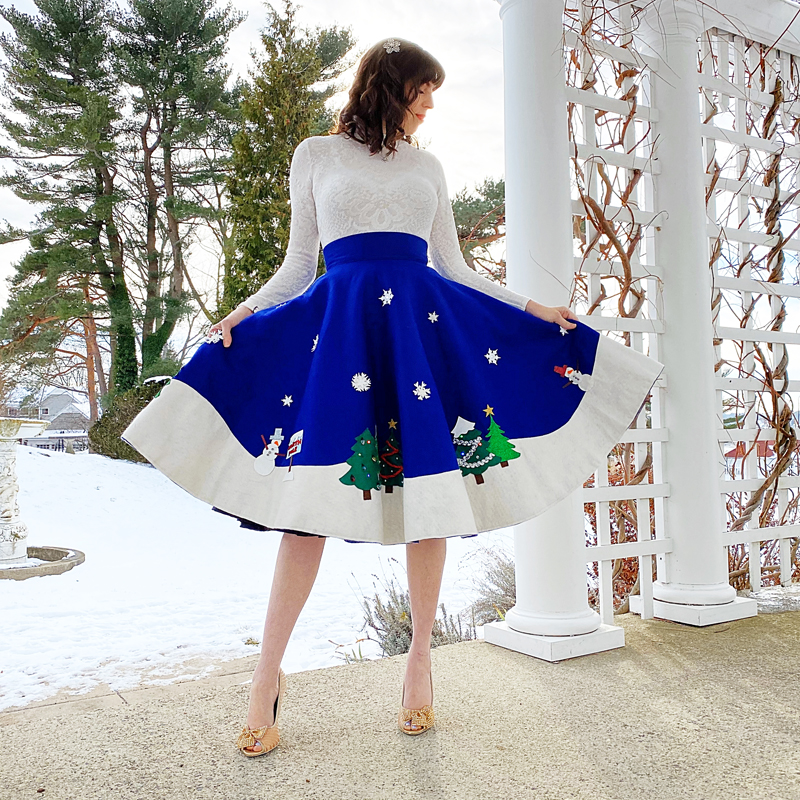
Fast forward one year. I approached Mr. Dressed with what seemed like an impossible idea – I wanted to create a winter wonderland scene, with rolling hills of snow, bespeckled with Christmas trees and snow falling all around, making me into a human snow globe. But, the kicker was: I wanted Christmas lights on the trees that would actually light up, surrounded by glittering illuminated snowflakes.
At the time, it seemed like a Mission Impossible kind of plan. In the coming weeks it would not only seem possible, but actually achievable with the right tools and the right husband…

(Powerpoint is my best friend)


The Design
This project would start with a circle skirt base, onto which I would attach all of the fabulous detail I had in mind. Although I had worked with felt elements before, this would be the first skirt I would make entirely out of felt. Because it would need to hold up a lot of appliqué (and let’s be honest, all of my hopes and dreams), I needed a high quality, wool blend felt that could withstand what I put my clothing through on a daily basis.
For my last appliquéd adventure, I discovered a friend’s Etsy shop BBD Supplies, which I used to create a series of leaves and vines. This new project would require a lot of felt and a bit of collaboration to get the right colors and scale of the elements – it was so helpful to already have a trusted source I could go to. I wanted the base skirt to be a deep blue, covered with white snow. But, it had to be the right blue and the right white. Luckily, BBD Supplies had sent me a swatch kit, with the felt they offered in every color of the rainbow.


After some deliberation, I went with wool blend felt yardage in “Midnight Dance” for the base and “Linen” for the snow. It’s a high quality felt that’s about 1.5-2mm thick, which had good weight without being too heavy. I went with 5 yards of each, which is what this tall girl needs to give her the fullest skirt her heart desires.
I’ve posted on how to create a circle skirt before if you want more of a step by step, but briefly – I cut out one half circle and two quarter circles of the Midnight Dance to make the skirt. Reason being that I hate a center front seam, but also hate a side zip. Real, venomous hate. So, I would attach the two quarter circles at each side, and put in a zip at the back to close.


For me, at 28″ waist and 28″ length, I cut my inner skirt radius to 4.5″ (which gives the circumference of 28.25″). Because this is a bit of thicker felt, it’s a good idea to give yourself a bit of wiggle room in the waist measurement and perhaps go a bit larger than usual.
I then measured and cut the outer radius to 32.5″ (ie, 4.5″ + 28″ = 32.5″, which gives a 28″ total length from waist to hem). The beauty of felt is that it also doesn’t need to be hemmed, so the length you cut is the length it will be.


Once the blue circle skirt was cut out and attached at the side seams, I cut out an identical circle out of the Linen felt. To me, this was far easier than trying to cut the shape of the “snow” directly from the yardage, which I knew would be a bit tricky to line up exactly right. So, I cut out a half circle, two quarter circles, attached it at the side seams (at 5/8″ seam allowance), and had an exact match to the blue circle. I pinned it all around to be sure it lined up.


I didn’t want to just go rogue with the snow, which I knew would be uneven if I didn’t get organized. So, from the bottom of the hem, I measured up 8″ and made a mark with my water soluble pen. Then, moving over, I made a mark at 5.” I continued to do this, moving around the skirt at (roughly) regular internals. This would give me the illusion of rolling snow drifts that would have some irregularity, but would still be balanced.
Once I made the marks all the way around the skirt, I could then draw on the shape of the snow hills. Using my very favorite chalk wheel, I drew a continuous curve – going up to my 8″ mark and sloping down to my 5″ mark, around the full circumference. I stepped back to assess my work and, confirming I was happy, cut out the “snow.”


Because I would be sewing a lot of elements to the snow, it needed to be attached securely to the blue circle skirt. So, I started stitching the white felt to the blue at the back seam and worked my way around the entire hem, going slowly and matching the edges carefully. For now, I left the upper seam of the snow unsewn – I wanted a bit of freedom to hide my appliqué stitches later if I so desired. I stepped back and admired my work – cause it really did look like soft snow drifts, just waiting for someone’s sled…
Base skirt done, the next step was getting all of the extra elements together to make this into the winter wonderland skirt of dreams…


The Supplies
Next up came the elements – the biggest challenge being the right trees in the right colors, and snowflakes in the right size. I have to hand it to Kris from BBD Supplies here – she was endlessly patient with me as we messaged back and forth about what I was looking for. She even put together a care package for me of sample tree and snowflake shapes so I could get a good look at them and decide what would work best.
After laying it all out on my dining room table (which was fully commandeered for this project), I decide to go with the Large Trees #2 and a custom pointed tree shape – both in a mix of kelly green wool, light green glitter, and green glitter felt, all without trunks (which I would add myself). BBD Supplies even custom cut them to 5″ and 6″ heights, which was what I determined would be the perfect scale for the trees. I loved the mix of greens and the way I could play with glitter versus regular felt, adding some extra dimension to the skirt.

For the snowflakes, I went with a bit of a custom order. I opted for snowflake #3 and #7C and #7D from this set (ie, the two smallest). They’re 1.75″ (#3), 2″ (#7C) and 1.25″ (#7D) in diameter, with the added bonus of #7C having a precut hole in the center (exactly the right size for an LED light to peep through). I decide to get 20 of these in linen and 20 in iridescent white glitter felt, to add a bit of extra twinkle.


I also ordered several 12×18″ wool felt sheets of felt in a range of colors – iridescent white glitter, gold glitter, red metallic, burgundy glitter, iridescent sky blue glitter, and silver glitter – which I would use to create various elements. Magpie that I am, I was completely enamored with the glitter felt and got it in nearly every color. What can I say? I’m a gal who likes her bling!
I then scooped up some regular craft felt from my local JoAnn’s once I realized I needed a few extra colors for a carrot nose or two….not to mention about 80 tree trunks.

In addition to all of the felt, I also knew I wanted to be able to trim my trees – thus started a hunt for sparkly beads, mini Christmas balls, and garland, which would give my forest the effect of being suspended into the great vat of Christmas cheer. Most of these elements I was able to source at Joann’s, keeping my colors mostly to reds, whites, and silvers.
Although I found some miniature Christmas ornaments on Amazon, when they arrived the scale was a bit too large for my trees (I can get very invested in things looking perfect!). But, luckily I was able to find even tinier mini glass Christmas light beads in the buttons section of JoAnn’s – just the right scale for my 6″ trees.


So, should you want to make this winter wonderland of a skirt, you will need:
- Wool blend felt by the yard in Midnight dance and in Linen for the circle skirt and “snow” from BBD Supplies (5 yards)
- Extra 12 x 18″ sheets of felt in iridescent white glitter, gold glitter, red metallic, burgundy glitter, iridescent sky blue glitter, and silver glitter for making all of your embellishments
- Regular craft felt in assorted colors (but especially orange (for the snowmen’s nose) & brown (for antler’s, tree trunks, etc.)
- 40 snowflakes (#3, #7C, #7D) in linen and white glitter
- Large Trees #2 and #1 in kelly green wool, light green glitter, and green glitter felt (6 of 5″; 6 of 6″)
- LED NeoPixels, microcontroller & wire from AdaFruit (+ soldering iron & solder) – see below for details
- water soluble/disappearing ink pen
- chalk wheel
- a craft scalpel
- leather punch – see below for details
- Assortment of beads (red, pearl, and silver), buttons, and trim (red and silver) to decorate the trees from JoAnn Fabrics
- Quick dry Fabric Glue and Fray Stop
- Gutermann thread (range of colors) and notions from JoAnn Fabrics
The Embellishment Party
Once all of the elements were laid out on my dining room table, then came the placement. In my original design, I had envisioned snowflakes falling around the skirt, with 6 single trees spaced evenly around the snow covered hem. When I started to play with the trees, I actually preferred the effect of creating clusters of trees out of the different colors, some in clusters of two, three, or four. It gave it a lot of dimension to layer them, playing with glitter and regular felt.

Then, I worked to place the snowflakes. Because I wanted some of the snowflakes to light up (but not all), I placed the ones with the hole in the center first to make sure they were evenly spaced, and then filled in the spots around them once I was happy with it. For some, I layered two and even three snowflakes on top of one another, altering glitter and matte, to give some depth to the design.
In hindsight (once everything was stitched and soldered), Mr. Dressed and I realized we should have been careful not to place a lighted snowflake right at the back where I was likely to sit. Although it hasn’t caused any issues thus far, my derrière’s might cause a bit of strain to the wires carefully soldered to the LED over time. But, live and learn!


With the trees and snowflakes in place, I just got to let my creative juices flow. This part was absolutely not one I had planned out, but just decided to let the materials dictate where I would go. The sky was really the limit, so I started to imagine all of the wintery themed critters you might find in a snow globe.
I started by adding a snowman, cutting out three circles of descending size, two arms and a carrot nose, and topping him off with some sparkly buttons and a top hat. He was just so jaunty I started to look for other fun wintery elements to add….

I decided to add a second snowman, this time next to a sign to advertise where all of this snowy business was taking place. Because I had plans for a polar bear (stay tuned), I knew it had to be the North Pole (science fact people: no polar bears in the South Pole!). So, I cut out a second snowman using the same method as above, and turned my attention to a wooden sign, glistening with snow, clearly stating our location.


I started with a blue base, and used that as a stencil to cut out some snow. Next, I snipped each letter out of red metallic felt, being careful but not needing it to be perfect. I put a blob of fabric glue on a plate and used a toothpick to put the glue onto the pieces I wanted. I held each letter with a pair of tweezers, put some glue on the back of each, and pressed it onto the base. This glue dries quickly, so you’ll want to work fast at this stage.
Once my letters were in place, I glued on the snow and attached a wooden post to the “sign.” Because I just can’t help but be a little extra, I made a little snowy mound out of white glitter felt to look as though the sign were coming up out of the frozen ground.


Next up, I decided to add an igloo (you know, should the snowman want to get in from the cold). I drew a few attempts, but it just looked like a half circle of white glitter. Along the way I realized that, in order to give my characters a 3D effect, I would have to cut them out in multiple elements. So, I started to work out how to create my igloo out of three separate pieces – the main body of the igloo, the foyer, and then the doorway, so it would look at though it was coming out of the skirt.


Because the igloo looked a little plain all on its lonesome, I decided to get a bit ambitious and see if I could create a polar bear. Flipping through some drawings on google, I drew and cut out 4 legs and a body out of linen felt and the head out of glitter felt. I set him in his proper place beside the igloo, guardian of my winter wonderland.


I must admit, by this time I had a boost of confidence and decided to see if I could make a sleigh. As before, I worked from a drawing, and carefully cut out each elements from felt, including a glittery gold bag that would hold all of Santa’s goodies.
With that done, I knew it was missing the reindeer to pull it, so I cut a body and legs from the burgundy glitter, and cut out antlers from some plain brown felt. I was seriously so impressed with myself that it didn’t look like a blob…. I laid it all out on my skirt and marveled at the extreme cute of it all…


At this stage, I may have been a teensy bit wild-eyed at what else I could possibly add (it’s really addictive). So, for a finishing touch, I decided a few of my treetops would be covered in freshly fallen snow. I used the trees as a template, and carefully cut out the shape from the white glitter felt. I also cut out a few sparkly stars to add to the tops of my trees (cause are Christmas trees ever complete without a star??).


After everything was cut, I laid them all out on the skirt and step back to check the balance of all of the elements together (this is yet another project where I have to be careful of my ‘more is more’ tendency). Once it looked good from all angles, I pinned it all in place.


Elements cuts and layout complete, I got to work with appliquéing it all onto the skirt itself. There was no turning back after this point. Starting with the trees and snowflakes that wouldn’t have the LEDs, I worked my way around the skirt over several hours. Luckily, I had old episodes of Project Runway to help me pass the time (Oh Tim Gunn, why aren’t we best friends?!).
I tend to appliqué with a backstitch, keeping most of the thread under the skirt and just a tiny stitch visible on the top.


For my wintery critters, I wanted to hand appliqué almost everything. Although it would take longer, I felt it would hold up a bit better and be more secure than glue, which is important with the level of twirling I tend to do. So, I set off carefully hand-stitching each element one at a time, using the same backstitch technique. This was the part where my manicure (and frankly, my fingers in general) started to take a serious beating…


Next up came my igloo, which would need both appliqué and fabric glue. Using the fabric glue, I started by gluing the front of the doorway to the back part of the doorway. I pressed them together and set it aside.


While the door was drying, I set to work appliquéing the back part of the igloo to the skirt, using tiny tight backstitches. Then (once it was fully dry), I glued the doorway in place, directly onto the skirt, completing the igloo.

My polar bear was going to be chillin’ right next to the igloo, so I decided to attach him next. But, Mr. Polar Bear (dude needs a name) took a little bit longer, because he had so many more elements. Starting with the head, I used a brown felt circle for a nose and the inside of his ears, a white glitter tail, and two beaded eyes. I glued the elements of the head together one at a time (which were pretty small), using my fabric glue.


After the head was complete and while I waited for the glue to dry, I carefully stitched the body and four legs directly to the skirt, using white thread. Once it was done, I attached the head to the rest of him with fabric glue, pressing carefully.

I also glued my reindeer together and placed him where he belonged in front of the sleigh. It wasn’t part of the original plan, but as I was placing my reindeer, Mr. Dressed came up behind me. In a second we both new – this would be no ordinary reindeer. Only Rudolph with his blinking red nose would do! It added an extra step to the process, but once we had the idea it would never be okay without it.

So, as Mr. Dressed went upstairs to solder Rudolph’s nose, I pressed on with appliqué. Before I knew what was happening, this skirt started to take shape. It truly felt like it belonged in some magical wintery kingdom, with glittery snowdrifts and friendly polar bears to show you the way…

Although the next step for this skirt usually comes at the end, I needed to put in the waistband and zipper now before we went any further. This felt bizarre at first – probably because it’s always the final step to my projects, and felt…just…wrong to do it before all tasks were complete. Despite my emotional resistance, it’s pretty important to get it out of the way early for this particular skirt. With the sheer heft of felt, I definitely had to twist and turn it and electronics may not have survived the adventure.
So, for this I wanted a wide 3″ waistband and a 7″ skirt zip. I cut out two 3.5″ wide strips (one for the waistband, one for the lining) and put interfacing on the outer band. I stitched it to the waistband of my skirt, and sewed in a cotton lining (which would be needed later to cover all of the electronics). Lastly, I added a simple lapped zipper (I say simple. This part always takes me at least an hour).


So, for the most part, the creation of the base was done! I laid it out to be sure that everything looked balanced and was pleased with the result so far. I have to say, my dining room was a disaster area at this point and I thought for the zillionth time how lucky I am to have a husband who doesn’t mind when I throw myself into these kinds of projects…


Speaking of wonderful husbands, before I could go any further, I knew I would need some help with the next step. Originally, I figured I would buy strings of battery powered Christmas lights, and poke them through the skirt. But, being the tech genius that he is, a few weeks of research and Mr. Dressed had a better idea. I’m going to turn this over to him for a bit to walk you through the process of illumination…

The Tech

Hi, Adam (Mr. Dressed) here! I was really excited when Kara asked me for help with figuring out a way to add lights to her skirt. I focussed my initial research on programmable LED lights, which I knew had become more widely used in recent years. After a bit of internet-searching, I came across a product called NeoPixels, which are a flexible LED light product sold by the fantastic electronics store Adafruit. Not only does Adafruit sell the NeoPixels, but they’ve created an entire platform designed around wearable electronics called FLORA, which turned out to be perfect for this project.
The FLORA platform is designed to be sewable into clothing, and consists of a number of pieces of electronics. For this project we used the following:
- FLORA microcontroller: This is like a tiny computer on a chip that controls the way the lights work and animate.
- FLORA NeoPixels: These are the LED lights, which can be programmed to show any color. We knew we would need a few dozen of these total, so we bought two of these sheets of 20 to save a bit of money (they can also be purchased separately if you need lower quantities).
- Battery holder: This holds 3 AAA batteries and can power the LED lights for several hours.
- Ribbon cable: This is used to connect the NeoPixels to the microcontroller and between one another. For most FLORA projects, you can actually use this conductive thread instead (it’s really cool!), but we needed to use regular wires due to the large number of lights and the distance between them.


I also used soldering equipment to solder all the lights together, which includes:

Since Kara and I were both working on critical parts of the skirt at the same time, we needed to plan out exactly how we were going to do things and in which order. We decided that it would be best if I could do all the soldering and connecting of the lights separately, and then attach them to the skirt after that part was all complete.
To start, I needed to know the length of wire that needed to be between each light, which meant I also needed to know the distance between all the elements that needed lights. So we laid out the skirt on the floor, measured the rough distance between each of the trees and snowflakes, and recorded it on a diagram that would serve as a blueprint for how the lights needed to be connected.


Armed with our blueprint, I then set off to solder all the lights together, which needed to be chained together in a long strand. Each connection required a set of three wires: one for power, one for ground, and one for the “signal,” which was what sent the commands to the lights to show different colors.
Instead of running three separate wires between each light, I used a single ribbon cable (which is like a single cable with multiple wires attached together), which made the whole thing simpler and easier to manage. Each NeoPixel LED had 4 connections that needed soldering, and with 29 LEDs total, it ended up being a good amount of work. But, once I found my rhythm I was able to complete it after several hours.


The final thing that needed to be connected was the FLORA microcontroller, which would be soldered to the beginning of the chain of LEDs. The microcontroller is like a tiny computer that is able to run programs that control the color and brightness of the LEDs. I wrote the code for the program on my computer, and then transferred it to the microcontroller using a USB cable.
I do software development for a living, so I wasn’t too worried about writing code to program the lights, but it was still something I had to take a bit of time to get exactly right. I programmed the lights for the Christmas trees to slowly change colors, and the lights for the snowflakes to slowly fade from a bright white to a dim one. Finally, we had one special light, Rudolph’s nose, that I programmed to blink on an off with a bright red glow.


I would encourage anyone who is interested in trying to add lights their sewing projects to give it a try! Even if you don’t have a background in computer programming or electronics, the kits that Adafruit sells are designed to be easy to learn, and Adafruit has loads of great documentation, instruction videos, and even forums where you can ask for help. They have a starter pack that contains four lights and everything else you need to get started. And remember that you don’t even have to solder most projects, the sewable thread works great for smaller stuff.

Aaaaand Kara’s back! Isn’t Mr. Dressed the best? (Seriously, I married well…) I loved working together on this – and was thrilled with the lights he found. I also absolutely love that AdaFruit is a 100% female-owned company. It started in 2005, and has since grown to over 100+ employees. There is nothing I like better than supporting small businesses, especially one run by rockstar lady engineers.
Although we had measured it all out carefully, it never hurts to double and triple check that everything was configured correctly before we started to make permanent changes to the skirt. So, we laid all of the wires on top of the skirt to confirm the measurements were right and no adjustments or extra wire length was needed. We also tested that the lights turned on to be sure there were no bad solder points. We were happy to see that everything lined up perfectly! Turns out, math works…


So, with the lights soldered and measurements confirmed, the next step was mounting them behind the skirt. We spend a lot of time brainstorming about the best way to attach the lights, and in the end decide to cut small slits in the felt, push the LEDs through (treating it kind of like a button hole) and then securing the slit on the underside with a few looping stitches. For this, we would need to gather up our:
- disappearing ink pen
- chalk wheel
- craft scalpel
- measuring tape
- a hole punch/leather punch (I got mine at Home Depot – this one is very similar)
- a wooden board (to save the floors – any piece of scrap wood will do)
I had to wrestle the measuring tape away from Finn (he’s hopeless at measuring things), and we were off to the races!


We did a few tests on some spare felt; given the size of the LEDs, the optimal slit size to fit the NeoPixel through without being too long was 3/4″. So, working one tree at a time, we would lay out the lights in the configuration we wanted them. Then, after tracing the tree with the chalk wheel and marking where the slits would be, I placed the wooden board beneath the skirt and carefully cut into the felt along my chalk mark with my scalpel.
We found it best to cut the slit horizontally, which was the direction the wires sat due to the solder. This meant there would be less stress and strain on the soldered portions.


Once the cut was made, Mr. Dressed carefully pushed the LED through and ensured it laid flat. This part was fairly delicate work, so we took our time. Because the soldered wires came out on either side, we would carefully push the LED up to the slit, and let the wires extend to the side and back so they would be under the skirt. This allowed for all of the wiring to stay hidden inside, but for the lights to be on the surface where they belonged.


For each tree, I wanted 3 lights that would slowly change color. So, we repeated this 3 times within our tree outline, until we had the 3 LEDs poking through to the top of the skirt. Then, we slowly worked our way around the skirt, making careful cuts and popping one LED through at a time. Unless you have an abnormally large table, I recommend doing this part on the floor so you can keep everything flat.


We then laid the tree on top of the LEDs and turned on the lights (lining it up with the chalk outline we made earlier). This allowed us to mark (with the disappearing ink pen) where the LEDs were on the skirt in relation to the overlaying tree we would appliqué on top.
We made three dots on the tree and, using a leather punch, put three corresponding holes on top of our marks (these are generally used for punching holes in leather belts – but works just as well on felt Christmas trees!).


From the back of the skirt, I wanted to secure the LEDs (and help protect the wires from being pulled). So, I did a few tiny loop stitches in the middle of the slit I had made. In addition to ensuring the LED wouldn’t pop out as I was twirling around like a loon (you know it’s gonna happen), this also helped the LEDs lay flat on the surface of the skirt.


I repeated this all the way around the skirt, until each tree and snowflake had their light, and each LED was individually secured. To double check our hole-punching prowess, we overlaid the trees with the holes on top of the LEDs, and watched the skirt light up the room!

After the light placement was set and the holes were punched in the trees, I spend about 12 straight hours trimming the trees and appliquéing like a madwoman. I decided to decorate each tree differently, leaving some plain, some beaded, and some with the whole works.
For this, I set out all of my materials and worked one tree at a time, working around the punched holes for the lights (if necessary). Because I knew where each tree would be on the skirt, I tried to keep a balance of color, with no two trees alike.

The fabric glue definitely came in handy here, especially for the garland trim. The best method I found was to draw a line where I wanted the trim with my chalk wheel. Then, I squeezed glue out from the bottle onto the line I drew, before pressing the garland on. I did a mix – some trees had red beaded garland, others silver sequins.


Once the garland was in place, I added a bit of Fray Stop to the edge of each piece, to help it from fraying with wear. This stuff is magical – I’ve used it on previous projects and it really holds up with wear. There’s nothing worse than putting all of this effort in, and having elements fray with a frolic or two.
Note it’s not necessary to use it on felt – which is made of pressed fibers and won’t fray. But other things (ribbons especially) will unravel over time.


While waiting for the trim to dry on some, I decided on my bead design and worked on each tree, one at a time. I used a combo of red beads, pearls, and silver beads. I didn’t draw or plan any of these out, but just sort of went with the flow, trying to keep it all balanced. The main tip I would offer here is that it’s important here not to pull the string too taut as you attached the beads, because you don’t want to distort the tree.


Once they were decorated, I pinned each tree in place on my skirt. For the ones with holes for the LEDs, I started by securing the openings over the LEDs first, and then worked around the perimeter of the tree.
I also appliquéd the trees without the LEDs, matching my thread color to the tree and using tiny backstitches around the entire tree perimeter. Although not invisible when you get up close, the stitches are barely seen from a distance.


I then carefully appliquéd each snowflake over the LEDs in the sky, sure to keep the snowflake centered over the hole. I have to say, appliquéing the snowflakes was a LOT easier, because it was just one hole to contend with. Every time you make a stitch, you slightly distort fabric. So, it got a bit challenging making sure the LEDs came through all three holes in the trees…


A few finishing touches of a bead or two and stars on top of a tree here and there, and this beauty was ready to light up the night!

The Final Finishes
Last but certainly not least, I needed a way to hide the battery pack and the microcontroller (needed to control and power the whole thing). We had decided the back seam was the most secure location and that the ideal strategy was to create two pockets that would both conceal and protect them.


So, I cut two pockets out of the navy felt about 2″ larger on either edge than the element I would be protecting. I then sewed a snap to the top of each and the corresponding snap to the inside of the skirt, so I would be able to close the pocket as needed.


Using a slip stitch and navy thread, I attached the pocket that would hold the battery pack to the back seam, stitching 3 of the four sides closed. I left the fourth (top) seam open, which would be where the battery pack would slip in and out.


I followed the same method with a second pocket, right next to the battery pack, which would hold my microcontroller. I then put both into their respective pockets, and snapped them closed.


Then, I sewed up the back seam of the lining, leaving about 8″ of the seam open, which I top stitched. This would leave a small slit in the lining, allowing us access to the battery pack and microcontroller, should we need to switch the lights on, change batteries, or reprogram anything. The slit was virtually invisible otherwise.


Lastly, I pressed the hem of the lining under and sewed the lining to the hem with a slip stitch, covering all of the electronics beneath, and added fasteners to the waist tab.


We held our breath and turned the switch on – scarcely daring to believe that everything was sewn on and it worked as planned! I could hardly believe she was done. In the nick of time too, as Mr. Dressed and I needed to get our butts on a plane the very next day and head off to snowier pastures. We were under a bit of a time crunch with this one, with the impending deadline of Christmas looming….


The Debut
When you’re a kid, a lot of people tell you that you can do anything. They tell you to keep dreaming and reach for the stars. I think that sentiment fades a little bit as we get older. We’re told – both from outside parties and ourselves – that we need to buckle down, get real, get our head out of the clouds. We think up impossible ideas and then almost always squelch them beneath our adulting. We are our own worst critic, stopping dreams before they start.
This was one of those moments where I had an idea, and am so happy I decided to follow through and see where it would go, instead of talking myself out of it. I may have failed at any of the million steps along the way, but I let myself give in to the possibility that I might not. And there’s nothing more magical than that…


It is the life of the crystal,
the architect of the flake,
the fire of the frost,
the soul of the sunbeam.
This crisp winter air is full of it.
John Burroughs


Thank goodness for the first snow,
it was a reminder–
no matter how old you became
and how much you’d seen,
things could still be new
if you were willing to believe
they still mattered.
Candace Bushnell


Winter is the time for comfort,
for good food and warmth,
for the touch of a friendly hand
and for a talk beside the fire:
it is the time for home.
Edith Sitwell


I quite literally lit up Christmas this year and I am THRILLED with this new creation. I knew the only thing for it was to venture home to New England and do a proper photoshoot, with snow on the ground and cracking fires to warm my toes by. No matter how far and wide we travel or where we currently hang our vintage hat, there is truly no place like home.
If you have a sewing idea that’s been percolating – but one you’ve squashed down, believing it to be too ambitious or too far-fetched – try pulling it out. Dust it off, warm it up, breathe new life into it. You just might surprise yourself with what you’re capable of doing.
As for this project: safe to say I sleighed it…
xoxo
Construction Details:
Circle Skirt: Self drafted
Skirt fabric: “Midnight dance” and “Linen” wool blend felt from BBD Supplies
Trees: Large Trees #2 and #1 in kelly green wool, light green glitter, and green glitter felt (6 of 5″; 6 of 6″)
Snowflakes: 40 snowflakes (#3, #7C, #7D) in linen and white glitter
Additional Appliqué: 12 x 18″ sheets in a range of colors
LED NeoPixels, microcontroller & wire from AdaFruit (+ soldering iron & solder)
Additional notions (beads, craft felt, glue): Joann Fabrics
Outfit Details:
Top: WHBM
Skirt: Made by me!
Coat: 1940’s, my mom’s (similar)
Necklace: Macys (similar)
Hair Clips: Pretty by Susan Jewelry
Handbag: Bettina Darling (similar)
Shoes: gift, Poetic License (similar here & here)
.
instagram // twitter // facebook // pinterest
.
Any items marked with a “c/o” (courtesy of) a retailer mean I was provided with an item for free in exchange for a review and/or feature on my blog. I always provide my honest opinion of any item I’m reviewing, regardless of whether it was sent to me as a courtesy item or if I purchased it myself. In addition, this post may contain affiliate links. This means that if you click and/or make a purchase through certain links or ads on this site, I may make a commission from that click and/or purchase at no cost to you, which helps with the day-to-day running costs of my blog.