
I was feeling pretty bolstered by my last sewing project and almost immediately jumped to the next. Given I have about 50 things in my head at any one time I want to create, plus an overflowing tailoring pile, the time I have never quite meets the time I need for sewing. However, after kicking the Imposter Syndrome squarely in the eye with my Garden of Eden dress, I didn’t stop to doubt myself and simply plunged on ahead.
I am definitely a lover of vintage. I love the history, the stories, the sustainability. But, a large part is due to the fact that I love having my own personal style. That each piece is so unique that I (usually) won’t bump into anyone wearing the same piece. And in our community, there are some pieces that are more rare than others. Some that we ladies hunt down like feral wildebeests. Eyes forever scrolling, trying to come face to face with our Unicorns.
I have definitely been lucky to have snagged more than a few of my Unicorns (eh hem). But, there are still some that have eluded me. Case in point is this most amazing trompe l’oeil ribbon print. I’ve seen it in dress form and in skirts and in at least 3 color ways, but I’ve never quite been in the right place at the right time…


But, as they say, necessity is the mother of invention. And when I can’t find something, I tend to think of some way to make it while I wait for the original (cause collecting vintage is alllll about the patience). So, I started a hunt for a similar print. I toyed with making my own, but accepted very quickly after about an hour messing with Photoshop that I am good at a great many things, but graphic design is not one of them.
If you are a vintage purest and want to stick with true vintage only, this fabric likely won’t be up your alley. But, if you’re open to pieces inspired by original 1950’s designs, and are one of the many who has been on the hunt for this print, then I’m about to make you very happy. Although my hunt will continue for the original vintage troupe l’oeil print that captured my heart, I’m more than happy to twirl around in this beauty in the meantime.
Besides, imitation is the sincerest form of flattery after all…

The Collaboration
Armed with my inspiration (a.k.a. many, many photos on Pinterest and bookmarks from vintage shops where I was a few seconds too slow), I headed to one of my favorite fabric sources: Spoonflower. If you haven’t ventured to Spoonflower yet, find yourself a spare 4 hours and get comfy. It’s an amazing collective for fabric designers, where you can either design your own or pick from among the hundreds of thousands of existing prints, and have them printed on just about every fabric imaginable.
I started my search to see if there was anything out there similar to the Print of Dreams. Although nothing exact, I happened upon a designer that had a hand-drawn print that approximated ruffles. Cause we get nothing in life if we don’t ask for it, I took a deep breath and messaged the lovely Lucy Baribeau to see if she might be open to modifying her existing ruffle print, changing the color story, modifying the width of the layers, and adding a stylized bow and stitch detail.


Luckily, Lucy was really excited to work together. I sent her photos of the original, and quick as lightning, she sent back her design. We went back and forth a few times, adjusting colors slightly and adding a band of cream to the bottom (so I could hem the dress to just under the bottom ruffle), but overall the process was a dream and I couldn’t believe how close Lucy’s design came to the original print.

The Design & Construction
So, I happily placed my order via Spoonflower and had the fabric on my doorstep within 4 days. Can you handle that? 4 days (having printing center in NC has its perks!). I ordered 7 yards – it seems excessive, but a skirt with Kara-level fullness would take up 3.5 yards. I also wanted to make a self-lined bodice and have enough to make my niece a mini-version.
In terms of fabric, I opted for the organic cotton sateen – I’ve used the Kona Cotton before, which I also like. But, I loved the slightly more lustrous quality of the cotton sateen. The colors were really bright and vibrant, and invited me to dive right in…

Although I do love the skirts I’ve seen made from this print, Amanda (a la Butch Wax Vintage) has a dress that was the first to steal my heart. So, my mission clear, I set about planning the design. I knew the dress itself would actually be pretty straightforward: a princess seamed bodice, with a ribbon threaded through the top, and a full gathered skirt. Lucky for me, I already had drafted a block for a princess seamed bodice fitted to my measurements thanks to this dress (minus the center panel).
For the straps, I cut out 2 long 2″ strips, which I folded in half and stitched on two sides. Then I turned them inside out and pressed them flat, stitching them in place when I attached the lining to the bodice. I took the time to do an under stitching the entire length of the lining – this really keeps your lining from rolling at the top of the bodice and gives a cleaner finish. I was able to cut out the bodice, lining, and do a large portion of the construction in only a few hours.


For the skirt, I measured a 125″ sweep x 30″ height rectangle (which, after seam allowance, I would hem to 27″). With really tight ruffles, I would then gather the top portion down to my 28″ waist. Luckily, this isn’t my first full skirted rodeo, and I can whip up a ruffled skirt in no time (I swear, everything in my sewing room whispers at me, “Kara…..make the skirt fullllllller….“).
Because of the fullness at the waist seam due to the ruffling, I opted not to line the skirt. The sateen was actually pretty opaque on its own, and I didn’t want to add any additional bulk. After Day 1, I had a pretty solid amount of work pinned to my dress form….


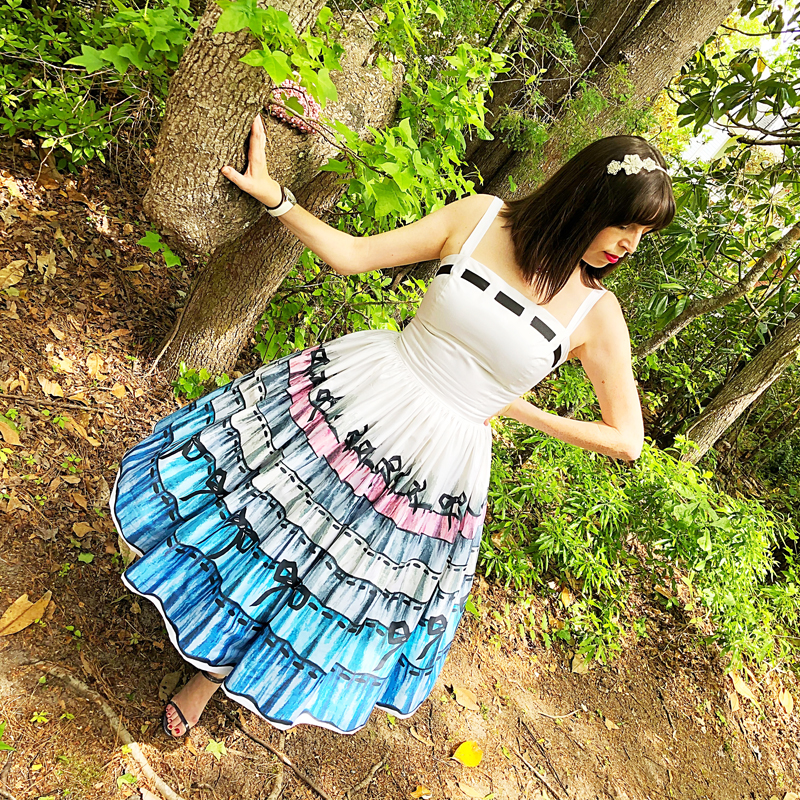
The trickiest part of the design was incorporating the ribbon trim to the top. I loved this detail on the true vintage dresses I had seen, as I thought it really pulled an element from the print up to the top of the bodice. This took a bit of planning – I could have gone for fabric paint (and really embraced the whole tromp l’oeil concept), but in the end I decided to go with realism and thread ribbon through to get the same effect. I opted for a black 7/8″ grosgrain ribbon, which has a small amount of texture and I knew wouldn’t let me down with fraying.
Although there might be a “right” way to do this, I decided to use buttonholes to create openings to thread the ribbon through. Because one never knows if the reality will be as good as the idea, I did a lot of planning ahead of time and ran several tests on scrap fabric. I double checked the width of the grosgrain ribbon, and added 1mm of wiggle room, dotting that width on the fabric. I then stitched my buttonhole to the outside edges of the blue dots.


The buttonhole strategy worked perfectly! If you’ve never done a buttonhole before, essentially it creates very tight zigzag stitches in a rectangular pattern. Then, most people use scissors to cut the fabric at the center of the buttonhole. But, many years ago I started using my seam ripper – I find this to be such an awesome sewing hack. I put the tip of my seam ripper at one end of the buttonhole, push it through, and carefully move it up to the opposite end.


Presto! Perfectly straight cut in the buttonholes. Feeling pretty chuffed that my test worked, I carefully measured all the way around the top of the bodice using my Water Soluble pen. I highly recommend a sliding gauge style ruler for this – you can set the slider where you want it, and then make all of your marks really easily. In the end, decided to run the ribbon 1″ down from the top of the bodice. I also went with uneven ratio of ribbon to bodice, so that I would have 2.5″ of ribbon showing, with 1″ gaps in between.
Then, I attached my trusty buttonhole foot and tried to dig in. But, this part was terrifying. If you mess up, the only option is to scrap everything you’ve done and recut and sew the entire bodice. But there’s a point with all sewing projects where you just have to put on your big girl vintage knickers, take a deep breath, and just start stitching.
I carefully stitched each buttonhole, opening the center with my seam ripper. Praise be, this part went smoothly and my STEM background paid off, because my math worked! Ahhh science.


I then started at the back of the bodice and threaded my ribbon through from one side to another. I was careful not to pull the ribbon too taut – you don’t want to squeeze the top of the bodice (and the top of the bust). But, on the flip side, you don’t want it to be too lose. We’re talking the Goldilocks of ribbon threading here people….


After trimming all of the little loose threads around the buttonholes, the last few steps included adding a lapped zipper to the back (which I’m really starting to come around to), a blind hem, and finishing the inside of the bodice by pressing under the lining and using my trusty ladder stitch (see how to do one of those here). I then put her on my dress form and let her beautify my sewing room for a few days until she was ready for her debut….


The Debut
I feel like this sewing malarky is getting easier, because I’m proud to say I finished this dress in 2 weekends. A few years ago, that would have been unfathomable. It absolutely helped to have my block ahead of time, because I didn’t have to worry about drafting the bodice or making a toile.


That which the eye perceives
the heart can feel


I couldn’t be happier with my vintage inspired beauty – while my eye will always be on the horizon for the true 1950’s piece, having the opportunity to collaborate on this print with Lucy and create something so close to the original has been eye opening. I highly recommend to anyone who has skills in one area, but perhaps not in another – reach out to fellow artists. Ask questions, collaborate. Joining forces can often produce something truly magical.
Lucy and I have already started plotting about our next project, which will be working on getting more color ways of this print! You can also take a look at some of her other amazing designs – I’ve already got my eye on this one…
And because, in my world, sewing begets sewing, I’ve already started dreaming up what my next creation will be.
Stay tuned….
xoxo
Construction Details:
Dress: Self drafted; Princess seamed bodice with gathered skirt
Fabric: Designed by Lucy Baribeau, sold at Spoonflower
Ribbon: black 7/8″ grosgrain ribbon
Additional fabric & notions: Joann Fabrics
Outfit Details:
Dress: Made by me!
Necklace: gift, Swarovski
Headband: Gift (similar)
Handbag: Moyna (similar)
Shoes: Jimmy Choo, thrifted (similar here & here)
Lip Color: Schiap
.
instagram // twitter // facebook // pinterest
.
Any items marked with a “c/o” (courtesy of) a retailer mean I was provided with an item for free in exchange for a review on my blog. I always provide my honest opinion of any item I’m reviewing, regardless of whether it was sent to me as a courtesy item or if I purchased it myself. In addition, this post may contain affiliate links. This means that if you click and/or make a purchase through certain links or ads on this site, I may make a commission from that click and/or purchase at no cost to you, which helps with the day-to-day running costs of my blog.