
I think we can all fall victim to a bit of Imposter Syndrome – you know, where despite your talent and skill, you feel that you really don’t know anything. And that it’s just a matter of time before your secret is revealed and you’re outed as a fraud. I think I’ve been internalizing this Imposter Syndrome with my sewing – despite the number of projects I’ve accomplished, I’ve always chalked it up to luck or the help that I’ve had along the way…
The Imposter Syndrome is alive and well whenever you spy a new project that seems daunting. As is often the case with my creations, they are born from a true vintage piece that I have hunted in vain. My love of 3D appliqué knows no bounds – and one of the very first I ever saw that took my breath away was a one shouldered, apple green beauty, looking like she belonged in the Garden of Eden. So perfect with her vines snaking up and around the bodice and swirling around her skirts, bespeckled with red and orange roses and dotted with green leaves. Pinterest just mocked me in her unavailability. And so I sighed and squirreled her away in my Want folder.
Now, I have it on good authority that two of my very favorite vintage shops, Coutura Vintage and Timeless Vixen, have listed this bit of sartorial perfection amongst their wares. So, there are potentially two floating out there. And yet I was never able to grab her….

Left Photo: Timeless Vixen // Right Photo: Coutura Vintage

Enter my latest project – if I couldn’t have the true vintage piece, then I would make my own! My previous sewing adventure with 3D appliqué ended successfully (after 40+ hours of work, mind). However, this time I didn’t have my trusty touchstone Sewanista to help resteer the ship should I go off course. But, I decided to plunge bravely on because, as it turns out, the only way to beat the Imposter Syndrome is to kick it square between the eyes and keep on marching…

The Supplies
The first step in any sewing project for me is to get organized. There were many decisions that needed to be made with this dress, particularly regarding the elements that would go into her creation. I knew I wanted to make the base dress out of a cotton or cotton sateen, but that the real challenge would come in finding the exact right shade of green. I hunted and hemmed and hawed, knowing I had to restrict my search to local shops, because color varies too much on screen to trust buying it online. Thankfully, I found the perfect deep grass green shade Kona cotton from Joann Fabrics.
Next came the appliqué pieces – there are about a zillion options out there, ranging from making everything from scratch to purchasing pre-fab. After weeks of research, I decided that I would make my vines and leaves by hand, but purchase premade flowers. There are a lot of tutorials out there on how to make the flowers yourself from felt squares, but I really wanted to invest my time in the appliqué (and I also wanted to be able to wear this dress before my 80th birthday).

So, benefitting from my weeks of research finding all of the materials, if you want to recreate this beauty, you will need:
- Base Fabric: Kona Cotton in Grass Green – I went with a full bolt (8 yards), as I wanted to have a fuller than full circle skirt and line the bodice with the same fabric. Plus, I wanted to be able to make my niece a mini version, as I like to do…
- Lining fabric (skirt only): Kona Cotton in Parrot
- Felt: 2 yards premium felt in Kelly Green for the long vines, & craft felt fabric in kelly green and neon green for the leaves
- Green thread (I used Gutermann sew-all polyester thread in spring green #716 & grass green #752)
- 3D felt posies – Large, X-Large, XX-Large, and XXX-Large in red, sunburst, and blush colors from A Market Collection
- Dritz Chalk Wheel
- Dritz 1/4″ boning with 5/8″ polyester casing

The Design
Next up came the base dress, which has a one-shouldered bodice and a circle skirt. Rather than draft my own pattern, I decided to go with an existing pattern for the bodice, onto which I would attach a circle skirt customized to my preferred waist and length. After a bit of digging, I found the Butterick B6323 one shoulder dress by Gertie to be exactly what I needed. According to the size chart, I went with the Aus 14, which corresponded to a 36″ bust and 28″ waist.


The original Butterick B6323 pattern called for a gathered skirt. However, a circle skirt would work much better for this design, as I didn’t want the appliqué to get lost in the gathers. Although it looks intimidating, these types of skirts are pretty straightforward to make. They just require a bit of math. From overhead view, a circle skirt will look like this, with the inner circle circumference matching your waist measurement:

For this circle skirt, I wanted a waist of 28″ and a skirt length of 28,” which I would hem to a final length of 27″. I’ve done a more detailed tutorial on making a circle skirt before, but in brief, we use that handy 2*pi*r equation we all learned in high school geometry. Because I was going to add 2 small 1.45″ pleats to give me a fuller than full circle (I just can’t help myself), I went with a 33.75″ waist circumference (ie, 33.75″/(2*pi) = 5.375″ radius) and a 33.375″ outer circle radius (ie, 28″ + 5.375″ = 33.375″), to end at my final 28″ skirt length. So, minus the pleats (which will remove ~5.75″ from the waist circumference), I would end up at my desired 28″ waist.
I folded the fabric, matching the selvages, and used a string to mark my inner (5.375″) and outer radius (33.375″). I then cut and repeated those measurements for both halves of the skirt and lining. Although my fabric wasn’t wide enough to do a full circle without any seams, you really want to make sure that you have enough to make two complete halves and not four panels, which will disrupt your appliqué pattern.


The Construction
I started this project by constructing the bodice first, which I knew would take the most amount of adjusting. I did a toile first and added 2″ to the bodice length – I find I need the bodice to be lengthened for most patterns for me. In this case, I found I needed extra length owing to (a) the side zipper (which vex me) and (b) the one shoulder detail. In all of my vintage one shouldered pieces, they seem to sit on the body in a way that always feel too short waisted.


This particular bodice also called for boning in the lining (which is helpful, as it gives a bit of extra support so the single shoulder isn’t doing all of the work). Now, one can make their own boning casing or actually sew boning into the seam allowance. However, my lazy self opted for boning that came with casing, which I stitched into the lining (as recommended by the pattern). I went with 1/4″ with casing, which was a bit tough to trim to shape, but overall worked well.


Once the bodice was constructed, I still needed to do more adjusting to the main pattern to add a bit of extra curvature to the bust (I found that there was extra bust gaping, but oddly also a bust flattening effect on the left side). I solved this problem by adding 2 extra darts to the bodice. This didn’t worry me, as I could mask the extra darts with appliqué if it bugged me later.
I also found this dress ended up much larger than the size chart indicated – although the Aus 14 for Butterick B6323 was supposed to be a 36″ bust and 28″ waist, mine ended up at 39″ bust and a whopping 32″ waist. However, this excess was easily nipped in at the side seam and zipper seam. If I make it again, however, I would definitely go for the Aus 12 or 10 (which is my normal Aussie size).
Once I had the fit where I wanted it, I lined the bodice in the same fabric, but did not affix it at the bottom. I wanted to be able to stitch my appliqué to the top layer, and later cover up the stitch marks with the lining.


The Appliqué
With the bodice done and the skirt cut out, next came the fun part – the decorating! Firstly I had to get all of my pieces together – I had ordered wool felt posies in a range of sizes (L-XXXL) from A Market Collection in red, sunburst, and blush. I also gathered my sheets of felt (in kelly and neon green), purchased from Joann fabrics.

The first step was cutting out what felt like a billion leaves – in keeping with the original dress, I decided to keep the leaves longer and oval, without any flourishes (there are a lot of different leaf styles out there people). I played around with different stitch patterns on them as well as beading, but in the end decided to keep it simple. Sometimes when there are a million elements, you want each element to be simple so that the whole image is striking. With too many details, the eye won’t know where to look.


Next up came the placement of the design. My favorite tool for this projects ended up being my chalk wheel. This handy little fellow is a GODSEND. Although it’s usually used to trace patterns, I found it perfect for testing placement of vines. The benefit of chalk is that if you mess up, you can just brush it away and no one is the wiser. So, I pinned the bodice to my dress form, and drew on the main vine, going from center front and curving up to the one shoulder. After stepping back and making minor adjustments, I was ready to move on to leaves.
I pinned the leaves onto the dress form, playing with angle and placement. I found that alternating the light and dark leaves looked best (and was similar to the original), but not keeping it so strict – cause foliage never plays by the rules. Once I was happy (this part took a surprisingly long time. Apparently I’m hard to please when it comes to leaf angle), I pinned the leaves in place. I also played around with different flower sizes, and found the XL in red from A Market Collection to be the right scale for the shoulder.


Once I had the locations where I wanted them, I took my yardage of felt (in kelly green from Joann Fabrics) and measured out long strips of 1/4″ width. I carefully cut these out, knowing they would never be perfect (which sort of adds the charm to these type of projects).
If you have a cutting wheel, this makes the process much simpler, and helps you avoid the stops and starts you can get with scissors. My rotary cutter and Olfa cutting mat are still in one of our many unpacked boxes (don’t judge), so it was scissors for me this time! I will say that felt can be very delicate – you don’t want to pull on your strips too hard, or they will tear.


Once I had all of the elements together, I took a deep breath and set to work affixing them to my bodice. Before I started, I did many test runs to find the best technique to fix the appliqué. My first instinct was to hand sew everything – I would have more control, as my primary worry was puckering of the material. But, I was surprised to find I had the least amount of puckering with machine sewing! I could hold the fabric taught and guide my machine around the curves. I also found the stitches provided “veins” for the leaves, which was a nice touch.

Following my chalk line, I stitched on the primary vine first. I didn’t pin it, but rather worked a few inches at a time and stitched at the center of the felt vine, following my chalk marks and working slowly around the curves. I then sewed on each leaf, starting at the base (where it connected to the vine) and working outwards. I found I only needed to hand stitch one leaf – which was the one that went over the bust curvature. All the rest were able to be stitched by machine.


Bolstered by the success of my bodice, I was excited to tackle the skirt. This would be a bit more labor intensive, and I needed a big, flat surface. I find that it’s best to do this part BEFORE you attached the skirt to the bodice. You can see the entire design laid out flat, and it’s much easier to keep the fabric pulled taut when sewing.
I laid out the circle skirt on the floor and grabbed my trusty chalk wheel (I’ve named him Burt. We are now bonded for life). Pulling a photo of the original dress up on my computer for inspiration, I started by drawing the center vine, connecting it to the center front where it would meet the vine of the bodice (this was something missing from the original – but I liked the idea that the bodice vine was just an extension of the skirt greenery).
Then, working one vine at a time, I drew the smaller branches, careful to step back after each one and adjust. This is really important – something that can look really good up close becomes too little or too much once you step back and take in the big picture. I found up close I was much more prone to numerous dramatic curves. But, when you step back you really only needed a single gentle curve to get the flair.


After I was happy with the vine sketch, I worked one by one and started pinning the leaves on. I tried to keep it balanced with the dark and light leaves, without being too symmetrical. As before, I would pin and step back and then make adjustments to the angle of the leaves as needed. This part took a looooong time, partly because I’m a bit of a perfectionist, but also because once you commit, there’s really no going back. I wanted the vines to be asymmetrical, but balanced, which took a bit of adjusting.


Once all of the leaves were pinned, I tested rose placement and color. Then, I cut out numerous strips of the 1/4″ green felt for the vines and set to work trimming them to length. Here, I made sure to cut them a bit longer than I needed – the last thing you want is to find later that you underestimated the length that’s needed on the curvature. Once they’re stitched, much easier to trim off the excess than try to add any on.


For this part, I sewed on the small vines first and ended with the center vine, which would cover the ends of the small vines and look as though they were actually coming off of the center design. Then, working one branch at a time, I stitched on the leaves, again starting at the base and working my way out. Although the planning took forever, the sewing actually only took a few hours. And it was sew satisfying (see what I did there??) to pin it to my dress form at this stage and see this beauty come to life.

A summary of the tips I discovered on this journey:
- Stitch the appliqué only to the outer layer of your garment (not the lining)
- Keep fabric taut when stitching to avoid puckering
- Hand tack pieces on areas of curvature (ie, bust)
- Stitch appliqué on before skirt is attached to bodice (much easier to keep flat)
- Plan out placement – step back and look. Adjust and repeat. Pin pieces down and then work one at a time once you’re at your sewing machine
- Be sure to take into account your hem when you figure out your design – you don’t want your appliqué too close to the bottom or you might lose some of it.

The next step was to appliqué the 3D roses. I had already planned out their placement and this part would just require sewing. For this, I highly recommend hand tacking – this is the part where you want full control. Given how large the flowers are, it would be incredibly difficult to use a machine stitch anyway.
I opted for several sizes of roses from A Market Collection: Large, (1.75″ diameter), X-Large (2.25″ diameter), XX-Large (3.5″ diameter), and XXX-Large (4″ diameter). I wanted to keep the color story to just three varieties. Although I played with a range of colors, I went with red, sunburst and blush from their bevy of options. I also worked to space out the colors to keep things visually balanced. Then, starting at the bodice, I carefully hand tacked each flower.
When I was playing with skirt flower placement, I realized that it made more sense to keep the smaller-scale flowers towards the waist and the larger-scale flowers towards the hem – almost like an ombre effect of flower size.


I don’t know of a “right” way to appliqué, but worked my stitches around the base of the flower, making sure I caught a good amount of felt (without the stitches showing from the top). For the larger flowers, I pulled the needle up through the bottom 3-4 rows of petals, and did a few tiny backstitches. I wanted to be sure that the base of the flower stayed flush to the skirt, but didn’t lose it’s 3D quality.
I will say, once all of the appliqué was done, this girl was HEAVY. I wouldn’t have expected ~10 felt flowers would add so much weight, but I was very glad I used a medium weight cotton and went to the trouble of lining and boning the bodice, which could support its heft. It’s good to keep this in mind if you decide to embark on the project – a flimsy fabric just isn’t going to be able to support the design.


The last steps were just finishes – I attached the lining to the skirt and then sewed both to the bodice, matching side seams and putting in my pleats at the back. I went with a bright neon green for the lining, which is my small homage to Marjorie Montgomery, who always had bright pop linings that only the wearer would know about. Once it was attached, I covered the waist seam by pressing under the lining 5/8″ and attaching it to the skirt using a ladder stitch, as below (see more detail on how to do a ladder stitch in this post).

I then put in a side lapped zipper (a.k.a. my nemesis, but I eventually defeated the beast) and hemmed the skirt to 27″. For this piece, to hide all of my appliqué handiwork, I pressed under the skirt hem 1″. Following around the length of the circle, I then pressed under the light green lining fabric about 1 1/4″, so that the two met with about a 1/4″ of the dark green skirt showing and pinned it all in place. I then affixed the lining hem to the skirt using a blind hem stitch (it took FOREVER – I forgot how much of a hem circumference I had made – but was worth it as I love how clean a blind hem stitch looks).


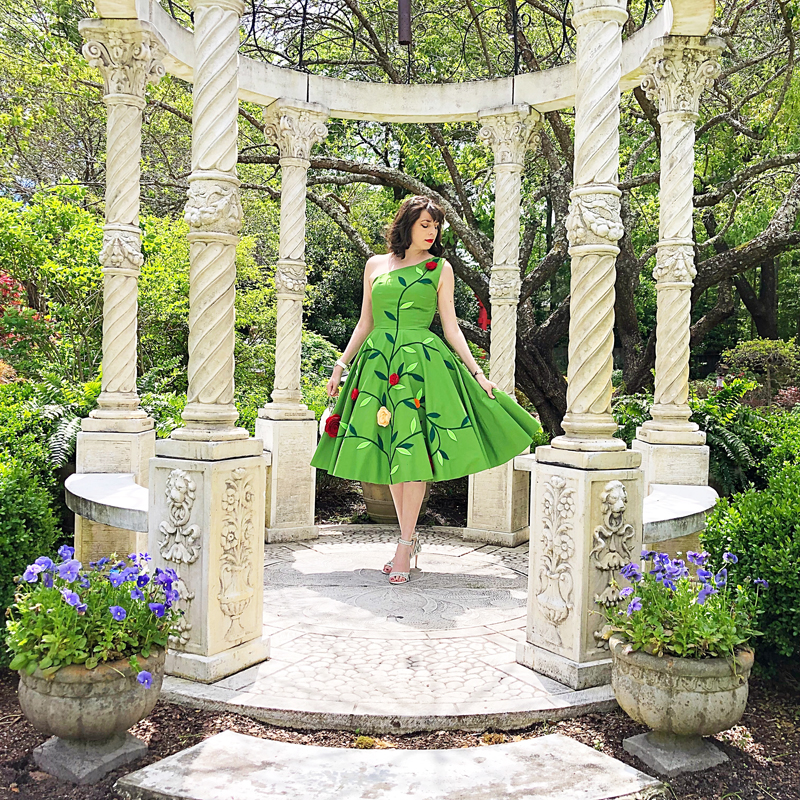
Before I knew it, I stepped back and saw this dress was complete! I was in awe, to be honest. This piece took about 23 hours to complete (not including time to research to source materials). Although the Imposter Syndrome was alive and well, I have to admit that, with each new project, my skills are definitely improving. Even a few years ago I feel it would have taken me MONTHS to put something like this together, and now she was ready for a night on the town after ~3 weekends of work.
The Debut
The only thing better than getting to make your own dress is getting to show it off! Once she was complete, I zipped her up and got that feeling. You know the one – where something fits you perfectly and you just know you will be making magic together. This piece is definitely worthy of everything from a gala to a garden party. Or, let’s be honest, a trip to the grocery store (I am me after all). Because the most important thing you will ever wear in your life, is the confidence to be yourself.


The garden suggests there might be a place where we can meet nature halfway.
Michael Pollan


When all was said and done, I actually think I like my design better than the original! In particular, I loved that the vine of the skirt meets the bodice in a continuum (which the original didn’t have). I also love that I was able to add a bit of design detail to the back, where the original vintage piece was blank. Because while a grand entrance is everything, there’s nothing like a bit of flourish as you walk away…..
I think in life, we are all constantly looking for fulfillment. I get so much joy in creating. In stepping back from the immediacy of clicking on “buy” and taking my time to build something truly one of a kind. It can be hard to find the time in between all of the things demanding our attention on a day to day basis. But, don’t forget to stop. Breath. Walk in the garden.
And when you can’t walk in the garden, be the garden….
xoxo
Construction Details:
Upper Bodice: Butterick B6323 one shoulder dress by Gertie
Circle Skirt: Self drafted
Base Dress fabric: Kona Cotton in Grass Green
Felt: Kelly Green (vines) & craft felt fabric in kelly & neon (leaves)
3D Roses: A Market Collection (sizes and colors above)
Additional fabric & notions: Joann Fabrics
Outfit Details:
Dress: Made by me!
Bracelet: gift (similar)
Hair clips: vintage (similar)
Handbag: Gift (similar)
Shoes: Alannah Hill (similar here & here)
.
instagram // twitter // facebook // pinterest
.