
Almost immediately following my last collaboration with the amazing Lucy Baribeau, where we brought one of my most coveted vintage trompe l’oeil prints into a modern day reality, we started chatting about the next colorway. Truthfully, they have all stolen my heart in different ways, and it was only a matter of time before each one ventured to my sewing table…
For the trompe l’oeil adventure part deux, we set forth to tackle the mustard and blue version of this skirt. Where the pink and blue was all sweetness and sugar, this mustard has a bit more of an arched eyebrow and a smirk. I have always felt that mustard is a neutral (at least in my world), and couldn’t wait to get my hands on this fabric to start sewing…


The Design & Construction
After the first iteration of this print, my girl Laurence had an amazing suggestion to add a printed line of trompe l’oeil “stitching” to the top edge of the selvage. This would allow for the extra print to be used in a skirt waistband or to take the place of the ribbon trim I had added to my last dress.
However, smart girl that I am, I didn’t realize that the extra detail was only added to the fabrics that were 56″ wide (ie, the cotton sateen) – do not be fooled by the photo that shows the fabric in blanket form. You need to see the trim in the first photo of the yardage to be sure it’ll be printed on your fabric. But, hindsight is 20/20 – I originally ordered the Petal Cotton (42″ wide), which was new to Spoonflower’s bevy of options and I wanted to try it out. Alas, my fabric arrived without the printed ribbon detail as in the product shot below.


As before, my order arrived in record time (6 days!). I liked the Petal Cotton – it had a good weight and feel to it, with the right balance between structure and drape (which is why I love working with cotton in the first place). If I had to choose, I do think I prefer the cotton sateen – it has a bit more softness and sheen to it, which makes the colors pop. And of course, the Petal Cotton is a narrower width and doesn’t have the added stitch print along the selvage.
So, without the extra detail, I would have to get creative. I still wanted the “stitching” on the waistband, which I think really pulls everything together. But, before I could get on with the details, I needed to get through the basics.

To keep things simple, I decided to make this fabric into a simple dirndl skirt (and at some stage I may take the extra fabric I have from my previous dress and make a top, so I can mix and match). Dirndl skirts are really simple – and have the added benefit of making them as full as humanly possible, depending on the amount of yardage you have.
I ordered 4 yards (144″) of the Petal Signature Cotton, from which I would make my skirt. From the number of these skirts I’ve made, I’ve found my ideal sweep is 125″, which I can gather down tightly to my waist size of 28″. I cut the length of my skirt panel to 125″ (plus some seam allowance), at a width of 30″ (which I would hem to 27″). Then I gathered to my heart’s content….

Next up came the waistband, where I still wanted the added effect of a ribbon to pull it all together. I had a few ideas on how I would achieve the ribbon look. Option 1: try to use fabric paint to get the effect, or Option 2: thread an actual grosgrain ribbon through buttonholes, as I did with the bodice of my last dress. I was torn, as I love the look of true trompe l’oeil, which can be achieved through hand painting (but I’m no painter). On the other hand, using actual ribbon would be pretty straightforward, as it was a tried and true technique. Well, the only way to see what I liked was to try them both.
Off I went to Joann’s and decided to try two different paint options. Firstly, I got a true fabric paint (Tulip soft matte in ebony). I also got a Ceramcoat black acrylic paint with a textile medium, which makes the acrylic more flexible and can turn anything into a fabric paint (and widens the range of color options considerably). I got a variety of different brushes and then set to work testing it out on the fabric…


Here’s what I learned from my foray into painting: Firstly, the soft black had a bit of sparkle to it. Now, I’m not a gal who ever shy’s away from sparkle (like ever), but I have to admit for this project, the effect it wasn’t my favorite as it seemed to full the black. The second most important thing I learned? I don’t know how to paint. I tried different brushes and different strokes. I tried drawing the shape on with a pencil first and painting over it, but I just couldn’t get it to look the way I wanted. My “ribbons” ended up looking like oddly shaped, black bloated rice that had swelled to alien proportions. So, onto Option 2!
I cut out two long strips for my waistband (a good rule of thumb is to take your waist, and add 3″ for seam allowances and waistband overlap). After interfacing one side and stitching them together, I pressed the waistband flat. On the side that would be the outward facing part of the waistband, I carefully measured my buttonholes. My grosgrain ribbon was 7/8″, so I went with 1″ buttonholes to be sure it would fit through without issue. As before, I also went with uneven ratio of ribbon to bodice, so that I would have 2″ of ribbon showing, with 1″ gaps in between (you can see more details on how to do this in this post).


Rather than working from one edge to the other, I found it best to pin the center of my waistband and work from the center out to the edges there – this will give you a much more symmetrical look when worn. It also means you can test the spacing beforehand to be sure that the ends of the ribbon will be coming out of the buttonhole (rather than in), allowing you to tie them.
Once they were all sewn, I opened up the center of the buttonholes with my seam ripper. I attached the waistband to the skirt at 5/8″ seam allowance, and threaded my 7/8″ ribbon through the buttonholes. I kept a long excess of ribbon at either end, so that I could use these as waist ties. To keep the ribbon ends from fraying, I made two angled cuts at the end of each side. Lastly, I pressed the backside of the waistband down, and top stitched it in place.


Last steps were just the finishing touches. I put in a back lapped zipper, added the hook and eye to the waist tabs, and finished with a blind hem. To be honest, I kept her on my dress form for about three days, because she brightened up the room so much. I love the sunny yellow hues with the bright pop of blue. The ribbon detail at the waist ended up being a favorite feature – she didn’t just add detail, but let me cinch the waist in a bit more or a bit less as needed.


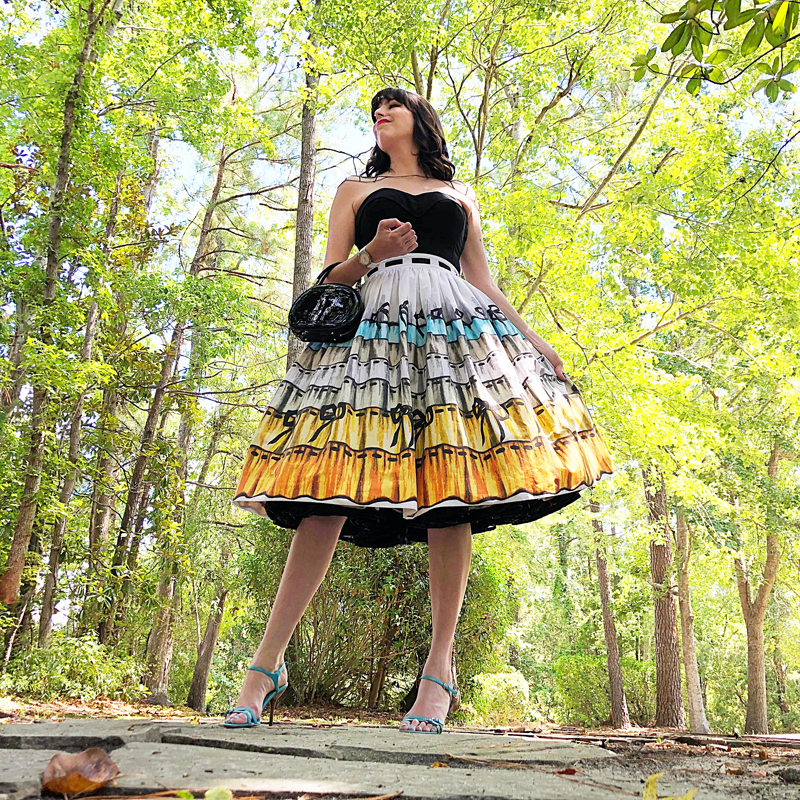
The Debut
It’s tough to say whether I like the pink or the yellow version of this print better, but I love having both. Nothing makes me happier than putting the final few stitches in and zipping up a piece to feel that fission of excitement. When you have gone from an idea, to its creation, to something that now exists in the world.
All in all, the skirt only took 3 hours from start to finish (with the bulk of the time going into the waistband detail) and I was so excited to show her off!


I have to admit I’ve worn this skirt several times already before the stars aligned long enough for me to get photos in it! But, I couldn’t be happier with this skirt – and love that I can mix and match with a range of tops.
I’ve actually already worn it with the Heart of Haute Estelle top, which was amazing against the pop of blue… But I think I achieved the perfect pairing with this Alexandra of California black bustier. I own it in white, and needed the black to exist in my closet. And it’s absolute perfection. I think I may need one in every color and every print imaginable….


With the summer coming to a close, I find myself staring wistfully around my sewing room. I know when the madness of the semester hits, there will be far fewer weekends devoted to sewing and far more devoted to playing catch up.
But I guess the truth of the matter is that we make time for the things that are important to us. So, although I may not be able to spent every weekend whirring away on my Bernina, there are still one or two projects I have up my sleeve. It just might take me a little longer to finish them. But, so long as there is always one project in progress on my dress form, I’m content.
In the meantime, Lucy and I have a few more projects we’re cooking up. So stay tuned….
xoxo
Construction Details:
Skirt: Self drafted; 125″ sweep, gathered skirt
Fabric: Designed by Lucy Baribeau, sold at Spoonflower
Ribbon: black 7/8″ grosgrain ribbon
Additional fabric & notions: Joann Fabrics
Outfit Details:
Top: c/o Alexandra of California
Skirt: Made by me!
Shoulder Chain: Gift (similar)
Handbag: Guess, sold out (similar)
Shoes: Steve Madden, thrifted (similar here & here)
Lip Color: Dior Rouge 634
.
instagram // twitter // facebook // pinterest
.
Any items marked with a “c/o” (courtesy of) a retailer mean I was provided with an item for free in exchange for a review and/or feature on my blog. I always provide my honest opinion of any item I’m reviewing, regardless of whether it was sent to me as a courtesy item or if I purchased it myself. In addition, this post may contain affiliate links. This means that if you click and/or make a purchase through certain links or ads on this site, I may make a commission from that click and/or purchase at no cost to you, which helps with the day-to-day running costs of my blog.