
A lot of my skirt designs have been based off of true vintage pieces that are so swoon-worthy, yet so elusive, I couldn’t wait another minute before making it mine. Occasionally, I will come up with an original design – sparked from my everyday wanderings, an inability to find just what I’m looking for, or based off of some crazy desire for a skirt that lights up. But this latest creation came from an off hand comment from a lovely friend and one of my very favorite handbag companies…
While scrolling through IG for the zillionth time that day, one of my favorite IGers Asta Darling tagged me in a Vendula London post – featuring their amazing Vendula London Water Lily tote bag. Her question was simple, “Don’t you have a skirt to match?” My first inclination was to write back with a sigh, “Alas, no.” But, just like that, the sewing wheels started turning….cause don’t you think I should?


The Inspiration
As you may have seen from previous points, I am a HUGE fan of Vendula London. From the quality of their bags to the whimsy they inject into everything they make, my current collection of Vendula handbags can bring a smile to even the greyest of days. So, we decided to join forces once again, where I would do a sewing first for me: bring their Vendula London Water Lily tote bag to life in a skirt.

The Design
While the bag was whizzing my way from London, I set to work on the design. I wanted to create a “pond” using a blue base Kona Cotton, on which I would appliqué my lily pads with a smattering of water lilies. I didn’t want the design to be too symmetrical, so I scattered the lily pads across the front left hem, and mirrored it towards the back right. I did a quick “sketch” in powerpoint (every scientist’s best friend) and started to gather my arsenal of materials…


I‘ve never made a skirt inspired by a handbag before, but the concept seemed pretty straightforward. I would just need to pick the exact right shades to compliment each other, keeping them different enough so the appliqué would pop. Recently I invested in the Kona Cotton swatch card – this has turned out to be a lifesaver, because I can see every shade they offer and no longer have to rely on the vagaries of a computer screen.
After poring over the light blue options, I decided to go with Cloud for the base – a beautiful light grey blue that reminded me of a quiet sunrise over a pond – and a slightly darker Cornflower for the lining.

For the appliqué elements, I turned to an old friend – BBD Supplies. I am lucky enough to also have their swatch cards, so I could compare all of their greens. I had some felt in grassy meadows, kelly green, moss, and others from previous projects as well, so I could hold up various swatches and figure out the best options for my skirt.
In the end, I went with 1 yard of wool blend felt in Grassy Meadows for the lily pads, onto which I would stitch “veins” in the leaves and bead them for a bit of extra bling.

Lastly, I needed the perfect water lilies. Although I could have made them myself, I have found that sometimes you’ve got to let the experts do their thing. So, I turned to a shop I have frequented before for other projects – A Market Collection.
The owner Amy was so lovely – we went back and forth on the design. Starting with the white daisies she already has in her shop as a base, Amy customized it for me, spreading out the petals, enlarging it to 3.5″, and modifying the center so that it would resemble the pistil of a water lily.

If you’re feeling inspired to create a similar skirt, you will need:
- 5 yards of Kona Cotton in Cloud for the base
- 5 yards of Kona Cotton in Cornflower for the lining
- 1 yd wool blend felt in Grassy Meadows for the lily pads
- 7 custom made felt water lilies from A Market Collection for the water lilies
- 1 sheet of wool blend glitter felt in light green and dark green for the frog (+ some miscellaneous felt to jazz him up)
- Green seed beads + beading needles (size 10-12)
- Scalloped wool felt trim in Grassy Meadows from Wool Hearts
- 9″ polyester zipper in ciel
- Tools: water soluble pen, fabric glue, chalk wheel
The Creation
Armed with all of my elements, the next step was to get sewing! I started as I always do, with the base circle skirt. I feel as though I can make circle skirts in my sleep at this point. I pre-washed all of my fabric (a must – especially for cotton) and cut out one half circle and two quarter circles of the Kona Cotton in Cloud for the base, so I could have a back zip, but keep the seams at the sides. I also cut out the same in the Kona Cotton in Cornflower for the lining.
I cut it to a 28″ waist (4.5″ radius) and 29″ length (34.5″ radius), which I would hem to a final length of 28″. If you haven’t done a circle skirt before, see this post for a detailed walk through. I stitched it together at the side seams and – voila! – I had the base on which to get to work….


The step that would take the longest would definitely be preparation of my lily pads. Going from my original design, I knew I would need ~16 lily pads total. I decided to make them in a small, medium, and large version for variety, cut from the Grassy Meadows wool blend felt.
I started by sketching the shape of the lily pad onto the felt with my chalk wheel (ahhh good ol’ Burt. What – no one else has named their chalk wheel??). The benefit here is that I could easy brush off the chalk and adjust as needed. Once I had the shape I wanted, I carefully cut out the lily pads.


Given some of my other designs, this skirt wouldn’t have an overwhelming number of applique pieces. So, I knew I could jazz up the existing pieces with a bit of bling without overwhelming the design. I decided to use green beading to create the veins in my lily pads – it would take a bit of time to do, but I loved that the skirt would have some extra twinkle.

Working one lily pad at a time, I drew on the veins with my chalk wheel. Bringing my needle through from the underside, I carefully threaded on a line of green seed beads using my beading needles. Once it was the right length, I poked the needle through to the other side.


I‘m not sure if this is the “right” way to hand-bead, but here’s the method I used to keep the line of beads in place:
- With the line of strung beads along the chalk wheel line, I started at the two beads on one end and poked the needle up through the felt at the join between two beads.
- I would then bring the needle back down again on the other side of the line of beads, pulling the loop between the two beads.
- I continued this all along the chalk line, looping between each set of beads until the entire string of beads was sewn down.


I repeated this for each “vein” of the lily pad, working my way around in a circle. This method allowed me to create curves in the line of beads, and kept them really secure.
The best strategy I had for getting these done was to do a few every night (trying to do them all at once will make you insane, social distancing or not). So, I slowly worked through my pile over the next several weeks to many episodes of Younger (is anyone else addicted to this show? Seriously, Sutton Foster can do no wrong…), until I had the cutest stack of glittery, beaded lily pads.


While I was whistling and working on hand beading, my water lilies also arrived from A Market Collection. Amy had thoughtfully sent me photos before they were shipped, but I have to admit I still gasped at the cuteness that was nestled into that carefully wrapped parcel. They were absolutely perfect, with their pointed white leaves and sunshine yellow centers.


Now that I had all of my materials in hand the the base skirt was complete, next came the fun part: placing all of the elements and getting my appliqué game face on! I wanted to have a spray of lily pads around the front left side of the skirt and a matching cluster around the back right, punctuated with a smattering of water lilies.
I lay out the lily pads first, playing with distribution of the three sizes and angling them this way and that and randomizing the different sizes to keep things from looking too uniform.


Following my sketch, I then placed the water lilies where I wanted them. Again, I wanted their placement to look random, but intentional. I stepped back to see the balance and, once I was happy with it after some tweaking, pinned them in place.In the end, I had 7 total water lilies scattered around them hem of the skirt.


And so began something I’ve gotten stupid quick at: hand appliqué! This part went really quickly – I just worked one cluster at a time, and carefully handstiched each lily pad on around he perimeter using tiny, tight backstitches. I matched my thread as closely as I could to the Grassy Meadows felt, so that when I was done you really couldn’t see the stitches unless you looked up close.


Once they were where I wanted them, I used white thread and hand stitched each water lily to the skirt. I would go up through all petals closest to the center, and then went around the edge of just lower petals, affixing them closer to their perimeter. This would keep the bottom layer of petals secure to the skirt, but still maintain the 3D quality of the flower.


In looking at the Vendula London Water Lily tote bag, I was really inspired by the scallop trim on the upper edge. I decided to emulate that with a scallop trim around the hem of my skirt, using the Grassy Meadows felt. I found another Etsy shop (Wool Hearts) that sold scalloped wool felt trim in the same color. They arrived and were (thankfully) a perfect match.


The trim came in in 12″ strips; so, first order of business was to sew them together to create one long piece that would go around the entire circumference of my skirt. Because I like my skirts fuller than full – this was no small task. My skirt circumference was about 208″ – which meant I would need to sew together 18 of my felt strips to go around the entire hem.
I carefully matched the scallops so it would look like one long continuous piece, and pressed each seam flat.


Once I had my long strip of scalloped trim, I started by attaching the trim to the hem. There are a few ways you can do this, but I wanted to attach it so that you wouldn’t see an obvious stitch line. So, with right sides together and scallop edge facing upwards towards the waist, I stitched the trim to the top of my skirt hem at 1″ from the edge, working my way around the entire circumference.
Once it was stitched down, I clipped the seam allowance of each felt strip so that it wouldn’t peak through at each join and ruin the illusion that it was one long scalloped piece.


After it was attached, I flipped the hem and pressed it along the stitch line – this allowed for just the scallop edge to peak through, hiding the stitches underneath the fold. I would later secure it to the lining, keeping it in place without any sort of visible stitch line.


Next up came attaching the lining and adding in the zipper and waistband. Starting with the lining, I attached it to the base skirt at the top waist 1/4″ seam allowance, so that the stitches would be covered when I attached the waistband.

Once the lining was attached, I closed up the back seam and attached my 9″ skirt zipper using a lapped zip technique (I found a very helpful tutorial on how to do this here). Thankfully, something clicked after making all of these skirts in the last year and it went in with minimal trouble.


Then, I cut out two 3″ wide x 31″ long strips from the Cloud Kona Cotton (General rule is to cut them 3″ longer than your waist (to account for seam allowance and a bit of a waist tab). I cut out one strip of 3 x 31″ interfacing and pressed it to the front side for stabilization.

I sewed the two strips together at the top and pressed the seam towards the back part of the waistband. Working very close to the seam, I stitched down the seam allowance at the back, folding the waistband at the seam, and pressing it flat. With right sides together, I then secured it to the waist of the skirt at 3/8.”


I stepped back at this stage to look at my nearly completed skirt. I felt like something was missing. After my winter wonderland skirt, I was pretty comfortable cutting out shapes to create vignettes and thought my fashion pond needed a frog to lord over everything. I wanted to tuck him on one of the back lily pads, where he would hold court but be a little secret you’d only see as I swished past. I started with a sketch…

I decided to cut my frog out of several pieces to give him 3D effect. Because it’s just not a pond of mine without some GLITTER, I cut out his body out of light green glitter felt and his legs and eyes out of the dark green glitter felt. starting with the body, I carefully attached him to the back lily pad. I added his legs and other features one at a time, finishing his face with a beaded eye.


As I was proudly showing Mr. Dressed the near finished product – he wondered why a frog in a lily pond would be chillin,’ when he could be catching flies. I swear, my favorite elements on every skirt I make usually comes from a comment from the Mister (Rudolph, I’m lookin’ a you!).
So, as the pièce de résistance, I cut out a swishy tongue and fly with some extra felt I had in my sewing room. Working with my fabric glue, I added these elements one by one and marveled at his charm…


As a finishing touch, I decided to add a bit of extra flair to the waistband by attaching a single, mini lily pad. (I KNOW. I just like it extra). I followed the methods from before, adding mini beaded veins and carefully attaching it to front of the waistband. I finished the inside waistband by pressing it under 3/8″ and securing it to the lining with a slip stitch all the way around.


I then pressed the hem of my lining under 1″ to cover all of my appliqué and attached it to the scallop trim with a slip stitch. This would cover all of the appliqué stitches and protect them from pulls as I go about my daily twirling. After a final pressing, the hem was complete!


Back over Christmas my mom was commenting on my sewing creations and how amazing it is that they might become part of vintage history one day. She mentioned that I should create a sewing label of my own to put into my Kara-made garments, so they could always be traced back to me and the blog. I could hardly believe I had never had this epiphany before, but a quick search on Etsy and I came upon The Heart of Wonder and their white glitter custom clothing labels. Yeah. She had me at white glitter.
So, I sent them my logo and these sparkly cuties arrived on my doorstep within 3 weeks. I have to say – they were absolutely amazing. I got a little emotional as I pulled one out to affix. So, as a final ceremonious step, I attached my custom made clothing label, sewed on my standard clasps at the waist, and this pond was open for business!


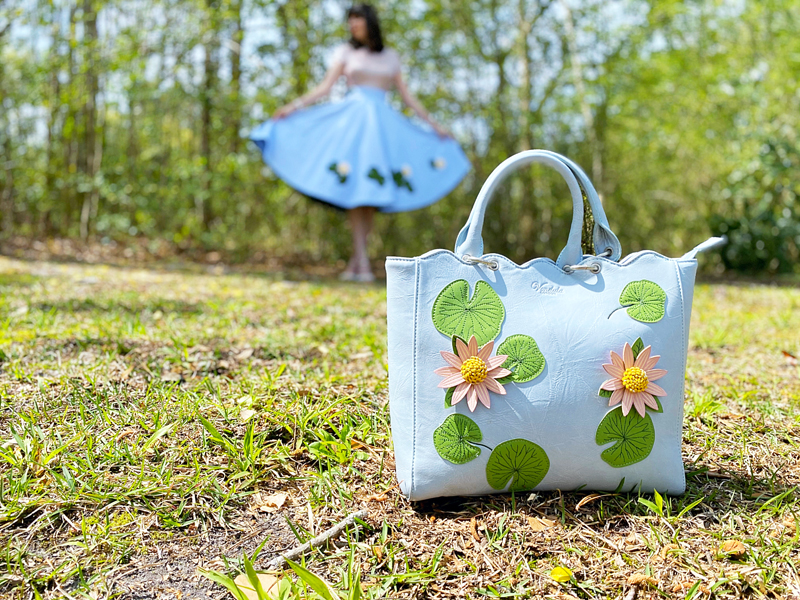
I have to say, this Water Lily Tote Bag is just the cutest thing. It’s made out of a soft, high quality textured vegan leather (PU) with amazing hand-stitched appliqués of water lilies and lily pads. The details I love Vendula for are overflowing in this bag – each element is brimming with details. The individually stitched veins on the lily pads, the grooves along each petal, and the soft looped yellow center of each water lily. I’m especially smitten with the scallop edge along the top of the tote – dipping and curving and inspiring one of my favorite elements on my skirt.
Measuring at 11″ height x 11.5″ width x 4.5″ depth, it’s a bit larger than a lot of my bags without being overwhelming. I love the versatility – I can see myself using out racing between lectures when I inevitably need to hold a plethora of gear, from my iPad to power cords to adapters. I love that it has an adjustable strap, cause this is a gal who loves her options. The inside is just as cute – it’s lined in a pink and lime polka dot, with a deep main pocket and 3 small pockets for your phone or other bits and bobs.
As with my previous bags, the quality of the workmanship is amazing – this isn’t a bag that delivers on cute but skimps on quality. It’s so well made, with perfect stitches and a complete 360 degree experience. Every time I look at it, I take in new details. The pewter stud feet to keep the bottom clean; how soft it is while still holding its shape; there are even a few cute lily pads on the back (cause who doesn’t love an exit?)
I was also pretty tickled at how well my skirt complements the bag – for my first creation inspired by a handbag, I’m pretty pleased with myself and will definitely be keeping my eye on other amazing skirts that might be inspired by Vendula London!


The Debut
The only way to get through the madness of social isolation these past few weeks has been in finding projects that bring me joy. This was definitely a welcome distraction – bringing some beauty into the world is never more important than now. I am absolutely in love with how it turned out, and even more in love with my matching bag! Here’s hoping I can take them both on a trip to the lily pond one day soon…


I have shaken loose.
Like the lily,
I rest on the deep water’s surface.
Not knowing the journey’s end,
I rest in nature’s embrace.
Patricia Robin Woodruff


The Vendula London Water Lily tote bag retails for $166 (on sale fro $132.80!) and can be purchased through the Vendula London website – there are a number of different style bags in this theme, if you’re after something in a smaller size, including the 3 Compartment Bag, Crossbody Clutch, and Flap Wallet, all sporting the amazing water lily motif. Even better – they’re having an Easter sale at the moment, and the Water Lily range is 20% off. Vendula London also ship worldwide, so what better than to have this cutie appear on your doorstep?
For those who are struggling with social isolation this week, know you are not alone! This is an unprecedented situation that we are all stumbling to find our footing in. The best advice I can give is to continue to find the things that bring you joy. Find a sewing project, pick up a book, go on a walk and explore a new neighborhood. We have to be in isolation, but we don’t have to isolate ourselves from the things we love to do. For me, I love to create. I love to challenge myself with an idea and see if I can bring it into reality. There is nothing more fulfilling than getting to twirl around in this skirt – even if the twirling has to happen in my own garden at the moment…
If you’re looking for a bit of joy – Vendula London can also be found on Facebook, Twitter, Pinterest, and Instagram. I hope you follow along and get sneak peaks of what’s coming next to their site.
Who knows, you may find some sewing inspiration of your own….
xoxo
Construction Details:
Circle Skirt: Kona Cotton in Cloud from Fabric.com
Felt Water Lilies: custom made by A Market Collection
Lilypads: Wool blend felt in “Grassy Meadows” from BBD Supplies
Beads: Glass seed beads in Christmas Green
Trim: Scalloped wool felt trim in Grassy Meadows from Wool Hearts
Additional notions (needles, glue, thread): JoAnn Fabrics
Outfit Details:
Top: Ted Baker
Skirt: Made by me!
Necklace: Swarovski
Handbag: Water Lily Tote Bag c/o Vendula London
Shoes: Betsey Johnson
.
instagram // twitter // facebook // pinterest
.
Any items marked with a “c/o” (courtesy of) a retailer mean I was provided with an item for free in exchange for a review and/or feature on my blog. I always provide my honest opinion of any item I’m reviewing, regardless of whether it was sent to me as a courtesy item or if I purchased it myself. In addition, this post may contain affiliate links. This means that if you click and/or make a purchase through certain links or ads on this site, I may make a commission from that click and/or purchase at no cost to you, which helps with the day-to-day running costs of my blog.